Showing posts with label 2D. Show all posts

Wednesday, 2 November 2011

Motion Graphics with After Effects

Yesterday I had a brief look at motion graphics and basic compositing inside of Nuke and how all these elements of a mock advert fit together. Today I'm going to be looking at something similar within After Effects.

As a general rule of thumb After Effects is sneered upon within the compositing community at large as something of a kiddies toy application, or a kind of a "my first compositing" package, and to be honest it's not with out some foundations. However this doesn't mean After Effect doesn't have it's place within creative industry, because as a motion graphics application, AE is second to none.

The tools that are provided with a Program like Nuke are perfectly suited to the high end compositing arena, more specifically working as a finishing package for assets created elsewhere (although with the addition of such elements like its 3D particle system that is beginning to change). After effects on the other hand is much more suited to creating these assets and compositing them as an in-the-box style of work flow.

The first clip that I made for this exercise was a pretty straight piece of motion graphics serving as another mock advert for my impending street scene. The matte of this particular shot was outlined in my Green Screen and Chroma Key blog entry a few days ago when looking at the technique of hard and soft matting.


This video differs from the Nuke motion graphics advert in the sense that all of the assets contained in this advert were created within After Effects itself and not having to rely on Maya to create anything. This is where the power of After Effects lies. * I should point out at this point that the workflow of After Effects is seriously compromised by it's stability and is something I have had a lot of issues with. This is an area where Nuke wins hands down as being one of the most stable applications I've used.


Anyway, after attaining a good key using Keylight (cross-application keyer works the same in AE as Nuke) I then set out to create the sequences look.

As the content of this particular shot oozed cheese, I wanted to create a style of advert that matched Adams dynamic performance. When I think about Cheesy adverts, generally I can't go past Japanese advertising. I love it. Generally my perception of these adverts is short and to the point with lots of bright colours.

As a point of reference I was influenced by a recent film clip by Mark Ronson. This clip is retro to the max and it is this old school retro visual style that I tried to emulate.


With this in mind I first set out to create some very simple animating vector graphics. I wanted them to be bright, colourful and above all simple sticking with this Japanese inspired theme. This I did with 3 simple checker board layers stretched out to create bars and animating over one another. The fonts were then created from a free download of Chinese font packs, again animated over simple, bright vector graphics.


This was all relatively easy and it all looked pretty good once it was done. After the animating part was finished I then turned my attention to the grade as this was what would sell the shit. Ungraded this shot look terrible. The lighting in this shot was one of the hardest things to contend with as it is so stark and all the lack of any definition made it hard to get a professional look.

The first thing I did was to create and adjustment layer that would effect all elements of the shot equally to give it some coherency. With these adjustment layers I reduced a lot of the red in his face and bumped up the contrast to give it a filmic look. On this layer I also added a glow to make the whites pop, this also served as a light wrap style effect that would tie the FG and BG elements together.


Thus creating the final product that is fit for Japanese television.

Tuesday, 1 November 2011

Motion Graphics with Nuke

Last time around I was looking at different techniques of Chroma keying, and all for very good reason, because today, I'm going to be showing you what I did with those lovely keyed sequences of my highly talented crack(ed) acting squad.

First up we'll look at Nesbeth. As you may recall when we last left him he was digging the smooth sounds in his new headphones and trying to nail a key on reflective objects within the scene. As I mentioned before, this didn't turn out to be a problem, because for this particular ad I used the key to artistic effect.


As you can see the final look of Matt in this ad is simply the alpha channel inverted. This is a very simple technique to achieve in Nuke. When using keylight key a green screen, this is the what you will get as an alpha channel. It is simple a matter of using the shuffle node, as handy little node that allows you to "shuffle" the colour channels of any give image around. In this case the alpha was inverted and then shuffled into the RG & B channels respectively, giving this as a final result.

Once the overall visual style was accomplished (and it is based on those Apple iPod adds) it was just a matter of finessing the final product. Again in true apple style I added a particle system which I created with Trapcode Particular and controlled via a few simple expressions written into the Particle emitters transform attributes (where it moves in 3D space) telling it to move around in a random fashion (random(x/2)/5 if you really want to know).
Particle system on its own screened over the existing keyed footage.

The next element to add were the headphones. This was pretty simple as I just made a loose roto shape and essentially cut them out to separate them from the rest of the footage. By doing this I was able to give the particles and the headphones the same colour and again control their changing colour by an expression written into a hueshift node. This time the expression being t*1, of time*1. This makes the hue of the effected element equal the time in the timeline, and thus will change as the time does.
Rotoscoped headphones enabled separation from the rest of the scene.

That was pretty much it for visual elements. This style of advert is very clean and would have been easily over cluttered so I though keeping it simple was the best plan of action. The only other element that was added was the text. This I wanted to keep with the particle theme and also was looking for an excuse to have a play with some Fluid Simulations within Maya. I soon figured out that it was actually pretty easy to take some text with an alpha channel and plug it into the fluids density, making the text the starting point of the fluid.


Once this was rendered from Maya, it was inverted in Nuke to fit the rest of the scene and a Min blend node was used to remove the white and keep the black (opposite to a normal alpha channel).
The final script in Nuke looked a little like this...Exactly like this actually.

This above image represents the node based system that Nuke uses as it's main interface. At the top of the tree there lies the main green screen footage, with the 2 nodes below the keyer and the shuffle node to create the inverted alpha look (B&W). On the right of that is the headphone roto branch with the Hueshift node (shifting colour) and 2 glows to light them up, these 2 paths were then mereged together.

This is the basis of how the Nuke interface works and once you wrap your head around it, it is a lot more streamlined and refined than working in layers.

Anyway, that's enough of that for the moment. Next time I'll be have a look at working with Motion graphics in After Effects.

Monday, 31 October 2011

Green Screen and Chroma Keying

For my last little exercise I decided that in order for the afore mentioned shot to take place I was going to need to create some adverts to place into the scene. As this is the future and all adverts are projections or on some large screen beaming they're inane messages onto unsuspecting citizens below, I decided to do a little green screen work.

With the kind help of my multi talented pals Matt Nesbesth and Adam Lyduch, we spent a brief half hour in front of a green screen recording some uber cheese.

Green screen work in a project such as this, and especially advertising is the process of separating the foreground and background elements by what is known as Chroma Keying. Chroma keying essentially takes a sample of a single unnatural colour, usually green or blue, and replaces this colour with transparency leaving a cut out of your designated object, also known as a Matte.

The first thing to take into account when doing chroma key work it light. It's really important to have good light on the green screen and as important to have good light on your subject. I noticed when doing this exercise that shadows are no friend of the keyer. This means to try and keep your subjects as far away from the screen as possible and to also make sure there are no kinks in the screen that could also cast shadows.

As this was a completely impromptu improv advertising session we essentially had to try and sell whatever was on our persons. This made for an interesting shoot.


This first video is of an hugely passionate and expressive Nesbeth. What a great job he's done here. I really feel his extacy and love for the music he's listening too.
This key was pretty straight forward except for what could have been some potentially problematic reflections on the headphones themselves. Reflective surfaces can be a real bitch as they pick up the spill from the green screen and punch holes in your matte.


As this image of the Alpha channel shows the holes left in the matte by reflections and spill from the green screen. Luckily this was not a problem with this particular shot as you shall see in preceding posts.

The second shot that I worked on from this shoot was of Adam Lyduch selling a phone. This was also an exercise in cheesyness.

Here there is a similar potential issue with a reflective, almost mirror like object of an iphone. Thankfully the phone was never on the right angle to pick up the green screen so we kind of dodged a bullet there.
For this second key I employed a process known as Hard and Soft keying. This is a method taught to me by my man on Frankenweenie, Mr. Jon Brady. Jon is a veritable wealth of knowledge on all things Nuke and what he doesn't know he will find out.
Hard and soft matting works by combining a number of different keys together to help achieve a natural looking key without loosing to much edge detail.


As this first image of the Alpha channel demonstrates, the edges of the key when compared to the original footage are very harsh with very little detail around the hair. This is the hard matte and is intentionality keyed this way. The hard matte is a very basic matte, the green is keyed, in this case using the program Keylight within Nuke and the edges shrunk, or dialated to the negative. The alpha channel from this hard matte is then piped to a second instance of keylight where it is added to the inside matte, meaning the opaque part, or white part of this image is added to the second keyer.


This second keyer, with the opaque hard matte piped into it is then used to bring back the edge detail and creating a more believable key. This can be seen in the hair and stubble area's as the softness and detail is clearly visible.

Wednesday, 19 October 2011

Multi-Channel Compositing


Here I've got a bunch of passes from my Robot for comp. Compositing is the process of taking all the elements that are going into a shot or sequence and essentially tying them together into one coherent image. This process quite often entails colour matching, focus matching and lighting adjustment. Green screen or chroma keying are also part of the compositing process as the need to "pull mattes" is central to a compositors roll.

For this latest exercise I wanted to do some touch ups of my robo-man to a level of accuracy that can't easily be done in a 3D package. As the compositing process is generally, but not exclusively, done in a 2D environment it is a lot faster and economical to do these touch ups as opposed to the 3D world. This however is a trend that is being challenged with ever more complex 3D systems being built into compositing software.

After my render was completed in Maya I exported my Robot via the .exr file type. .exr's are a very very handy file format. Developed by Industrial Light and Magic, .exr's enable a 3D artist to embed as many passes into the one file as necessary. Having this level of control makes the compositors job much easier to tweak any aspect of a particular sequence.

Below is the process of my quick comp job on my robot and outlines the amount of data that can be packed into and .exr file.


This Image is my straight rendered .exr file directly from Maya into Nuke. The image is displaying all layers concurrently and looks blown out due to incorrect layer blend modes. However once the .exr is unpacked and manipulated this ceases to be a problem.
Most Image formats that people are familiar with such as JPG and GIF files generall carry 3 or 4 channels, and RGB and an A, or, Alpha channel for transparency information. As you will see with the next series of Pictures, one .exr file can carry infinitely more than this.

When rendering out multiple passes in Maya, it is generally done in a lighting type basis. That is, all the separate aspects of the lighting state are broken down into their constituent parts to allow greater control over the fnial output.


This first cell is the diffuse pass. This is a lighting pass that will only render light that is reflected from a surface in a diffuse, or Matte way. 


The next pass I rendered out is the Specualr pass. This deals with the highlight of the objects materials and generally appears on shiny materials. The blend mode for this was screened over the top of the diffuse pass removing the blacks and just leaving the highlights.


The next pass is the reflection pass. This, as the name suggests, has simply picked out all the reflections from shiny objects. This is very handy as the over look of the material can be altered by adjust this pass.


This next pass is the shadow pass. The blend mode for this worked on a subtract basis, that is all the pixels in this pass are used to subtract, or add darkness to the composite image.

This final pass is whats known as a depth map. It is used as a matte to control a z-depth blur. When attaching a depth map to a z-depth blur, the darker areas are uneffected by the blur, where the white area's are completely blurred. This is used to give the render depth of field, thus the name z-depth blur.

After tweaking the final comp came out like this.


As you can see when compared to the top image, the straight Maya render, multi-pass compositing adds the final sheen to a CG render. The process is extremely fast and is a great way to get results that are rarely seen with a 3D package alone.

Thursday, 6 October 2011

Matte Painting

So, as a pre cursor to getting into the animated/live action VFX, I thought I'd do  few pre-viz matte paintings to get the feel of the old faithful, Photoshop again.  Matte painting goes back a loooong way in the VFX/SFX industry. I'm sure you've all seen those amazing paintings in the background of some Hollywood lot of mountains or galaxies etc. Something a little like this no doubt: 
The classic Wizard of Oz matte paintings. Follow the yellow brick road. 


Needless to say with the advent of programs like Photoshop, Matte painting has moved on considerably since then. The art of matte painting now involves as many aspects as the compositing process, using CG, real life photo textures and good old fashion painting techniques. Here's a good example of what is now possible through the magic of computers.
Couracant from the new Star Wars films. Bad ass Shiz!


The technique for something like this would be a mixture of CG modelling basic geometry which is then passed to the Matte Painter to weave some magic and add the detail and subtitles by hand.
Not only is matte painting for the purpose of static (and sometimes dynamic) backdrops, but with the development of such 3D packages as Maya and Max, a matte painting can of touched up geometry can then be imported back into the 3D package and projected back onto the original geometry as a way of adding high quality texture and a level of precision that is not possible through 3D texturing alone.


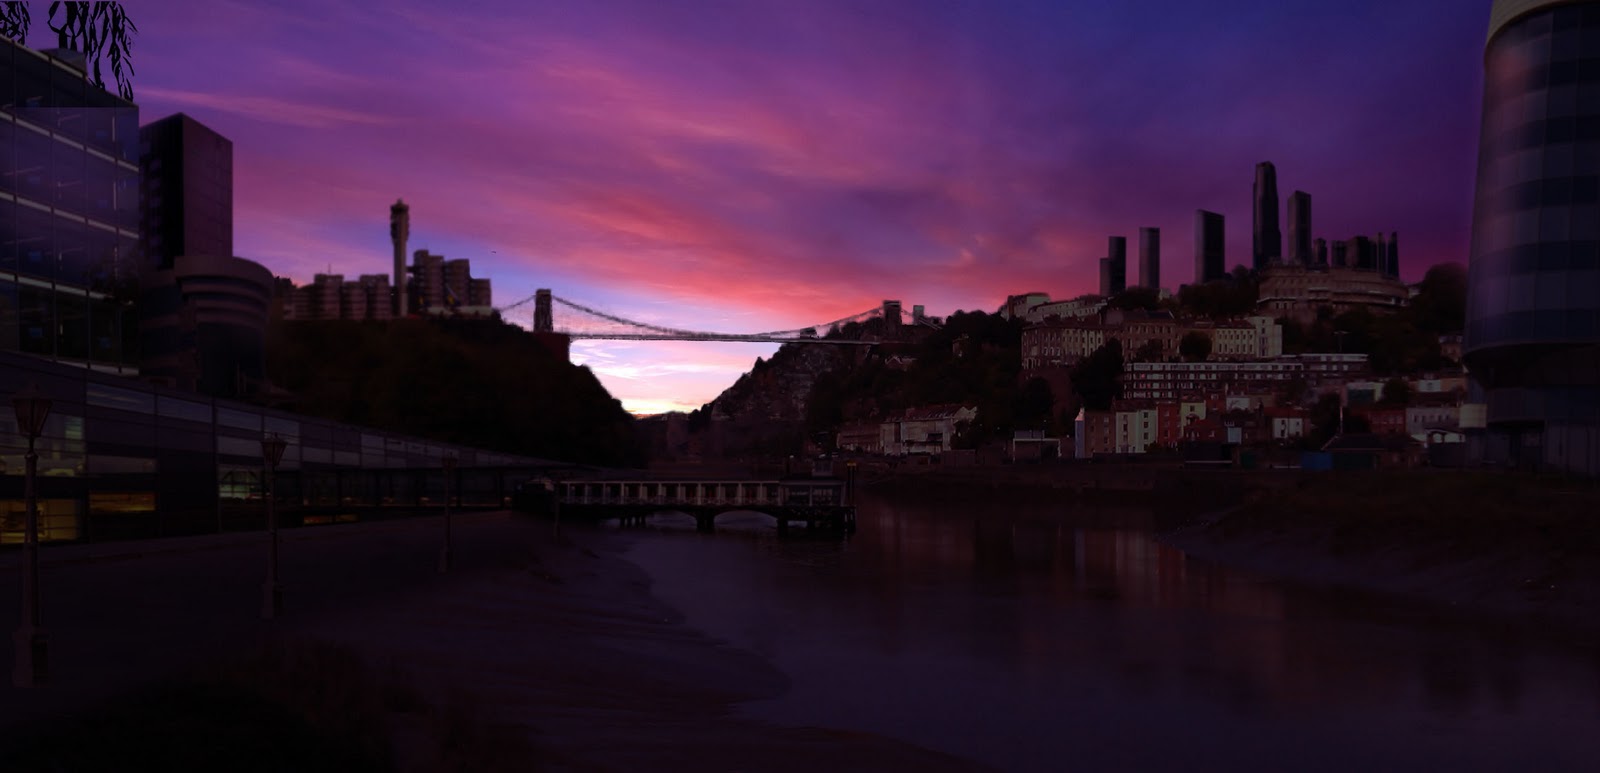
Anyway, here's a few Pre Viz matte paintings I've done on a quick snap I took of the Avon Gorge here in Bristol. They're just matte tests to get a bit more practice in Photoshop, but the process of making these shots has given me a glimpse at the possibilities of matte painting. 


These 3 shots are all the same photo and I was having a little play with the history of the Avon Gorge playing with some visualizations of Yesterday, Today and Tomorrow.
Still very rough but a worth while exercise!